The Ultimate Workflow of Creating Scroll-Based Animations
Why Scroll?
Scrolling is the fundamental interaction of the Internet. Having animated elements triggered on scroll is a common practice, but what if you want to take it to another level? For example, websites like r2d3 — A visual introduction to machine learning and NASA: Prospect all features full-scale animations that users can control and interact with through scrolling.
I was really drawn to this form of interaction, which has inspired me to create OKAI — An Interactive Introduction to Artificial Intelligence(AI). Every chapter (except Chapter 0) features full-scale scroll-based animations that visualize and break down complicated concepts in AI. Allowing users to control the pace of the animations give them a sense of control and security when exploring the unknown world of AI principles.
https://okai.brown.edu/chapter1.html
In this article, I am presenting the workflow of how these animations are created and controlled through scrolling.
The Ingredients
Software
- Adobe Illustrator & After Effects
- Bodymovin Plugin for After Effects
JavaScript Libraries

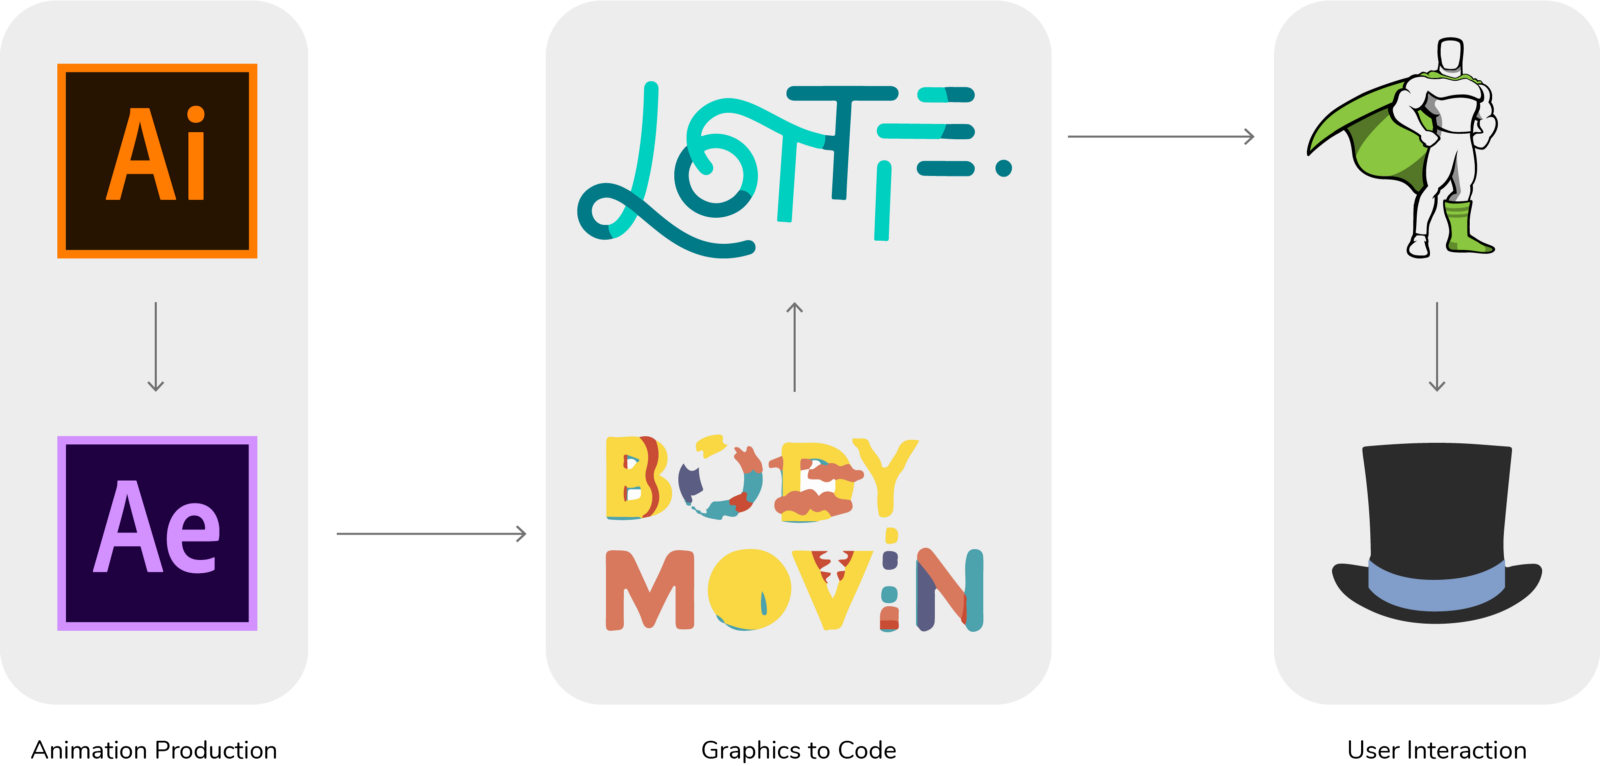
Overview of the Workflow
Don’t be scared if you don’t recognize some of the things listed. They are all very well-supported and easy-to-use pieces of software that work really well together.
Basically, you would create some graphics in Illustrator, load them up in After Effects, and create the animations that you have dreamed up. Then, use Bodymovin to export the animations as JSON, a lightweight format that is designed to work with JavaScript. Lastly, load the JSON animations up with Lottie in your browser, and use GreenSock with ScrollMagic to control how much the animations should play based on how far users have scrolled.

Why I Do It This Why
If you have worked with GreenSock before, you might know that you can directly animate graphics created from Illustrator with it, so why all the fuss about using After Effects and a plugin and a JavaScript library?
GreenSock, despite being a powerful tool for JavaScript animations, is still a coding-based platform. It would be fantastic if all designers and animators in your team can code in JavaScript, but, in reality, coding is not something that all design schools teach. This is the reason why I spent so much time and energy into developing this workflow to bring my designers and engineers together. The artists can create whatever they dream of using Illustrator and After Effects and do not have to worry about whether the engineers can implement it or not. All the heavy lifting of converting from graphics to code is taken care of by the wonderful combo of Bodymovin + Lottie, thanks to the people at Airbnb.
How It All Comes Together
You can find all the code below in my CodePen or in my GitHub.
Step 1: Load in the libraries
For the workflow to work, we need to load in the three libraries: Lottie, TweenMax(GSAP), and ScrollMagic. You can also use jQuery for more flexibility if you want to. Note that for ScrollMagic to work with GSAP, you need an additional script, which I have pasted below:
1 | https://cdnjs.cloudflare.com/ajax/libs/ScrollMagic/2.0.5/plugins/animation.gsap.js |
Step 2: Add essential HTML elements
In order to load and control our animation, we need two empty divs: one is a container that the JSON animation will be loaded into (robotLottie), and the other one is a trigger element that kick-starts the animation(trigger).
1 | <!-- animation div, used by Lottie --> |
Step 3: Load the animation and set up event listener
Before we do anything with the animation, we need to load it. robotAnimWindow refers to the container div we just defined, and robotAnimData is an object that contains all the parameters that define how the animation should be loaded. The path parameter is the path to the JSON file. After these two are set up, simply call bodymovin.loadAnimation() to actually load the animation. addEventListener() function sets up an event listener when DOM is loaded.
1 | var robotAnimWindow = document.getElementById('robotLottie'), |
Step 4: Set up the animation timeline
After the animation is loaded, we need a timeline to tell it to play which frame at what time. When DOM is loaded, the function onRobotDOMLoaded() is called to add a tween to tl . This is the only tween we need; it starts the animation at frame 0, and plays it frame by frame as the user scroll until the very last frame. The onUpdate property is triggered whenever the user scrolls, and advances the animation by one frame.
1 | var tl = new TimelineMax(); |
Step 5: Hooking it up to ScrollMagic
Our final step is connecting our timeline to ScrollMagic. Firstly, we initiate a ScrollMagic controller, a must if you want to do anything with ScrollMagic. Next, we need to create a scene for the animation, and add it to the controller. The animationScene’s duration property controls the vertical scrolling distance needed to play the entire animation, triggerElement tells which element should kick-start the animation. Lastly, setTween() connects the scene to our animation.
1 | let controller = new ScrollMagic.Controller({ |
Conclusion
Hope you have enjoyed this tutorial! There are much more crazy possibilities that await you in the realm of scroll-based animations.